Pages

Monday, February 13, 2012

Savory Bacon and Egg Cupcakes


These are full of tasty breakfast goodness and they're cupcakes?! Get outta town! 
I found this recipe on pinterest and I am so glad I did! They did require a bit of prep work, but they were definitely worth it. I used the "Simply" biscuits to make this recipe because they do not have trans fat in them like many of the others. Kinda silly I know because then we top them with bacon and eggs, but hey, every little bit helps! Luke loved them, not a big surprise there. They are definitely not something we'll be eating all the time, but every now and then you need a little bacon!


Bacon and Egg Cupcakes


Ingredients

  • 1 can Pillsbury Simply buttermilk biscuits
  • 10 eggs
  • 10 pieces of bacon
  • salt and pepper
  • 1/4 cup shredded cheddar cheese (optional)


Directions


Preheat oven to 350 degrees F.
Begin cooking the  bacon in a skillet over medium heat. Cook for about 4 minutes, flipping once. You want the bacon to be cooked but not crispy.


While the bacon is cooking, spray muffin tin with cooking spray. Divide the biscuits and place one in each muffin cup. Press the dough up the sides of the cup.


Once the bacon is done and has cooled off, cut each strip in half.   Place the two halves in the muffin cups, like so.


Crack an egg into each cup.
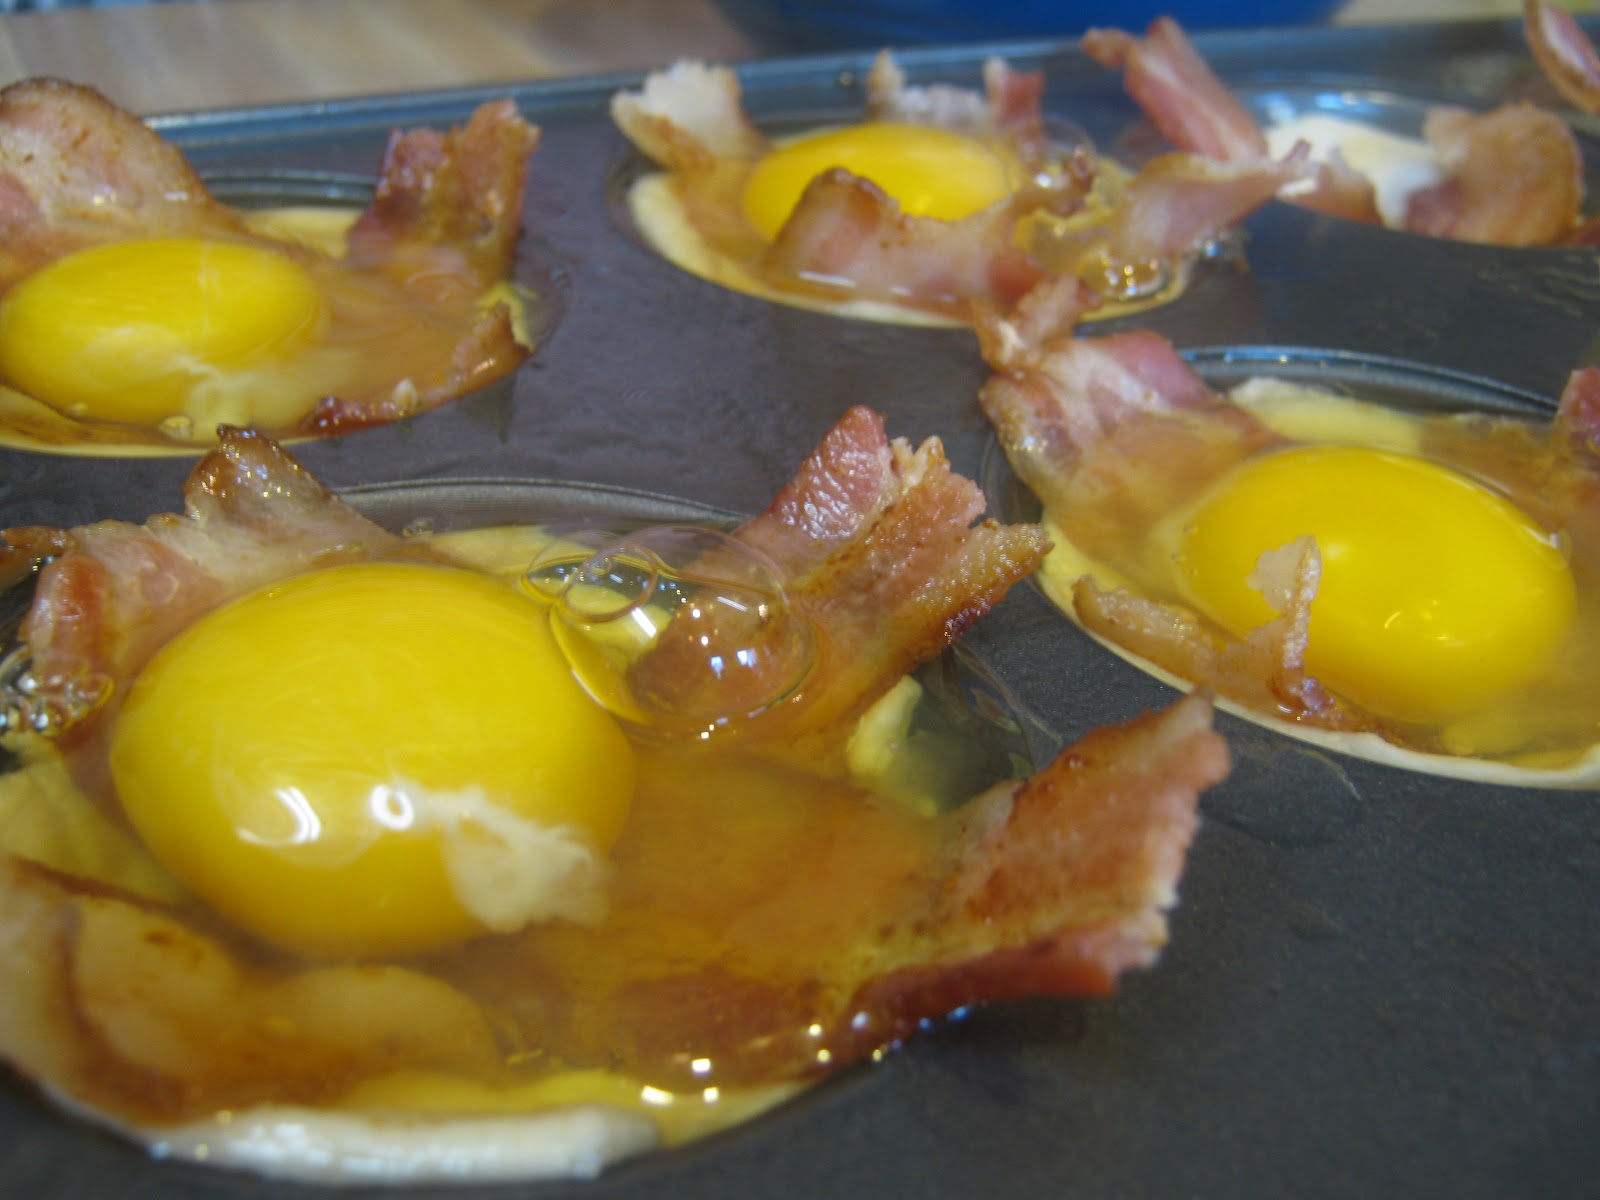


And sprinkle with salt and pepper.


Bake for 25-30 minutes. Remove from oven and immediately sprinkle with cheese. 


 Serve and enjoy!


Adapted from: http://www.bettycrocker.com/recipes/bacon-and-egg-savory-cupcakes/1465ef49-f723-4458-ac60-a2b2d965b5d0

Friday, February 10, 2012

No Bake Cookies


The other night, after finishing up dinner, Luke asks "So, what's for dessert?" These cookies immediately came to mind because they are super fast to whip up! Plus, I usually have all the ingredients on hand.These are just about the easiest, fasted cookies I know of. They are super peanut buttery, chocolaty, rich, and delicious.  They, however, are lacking in the looks department. They sort of remind me of mini cow patties. But don't let that fool you, these are so yummy! 


No Bake Cookies


Ingredients
  • 2 cups sugar
  • 4 tablespoons cocoa
  • 1 stick butter
  • 1/2 cup milk
  • 1 cup peanut butter
  • 1 tablespoon vanilla
  • 3 cups oatmeal


Directions


In a heavy saucepan, bring the sugar, cocoa, butter and milk to a boil. Continue to boil for 1 minute. Remove from heat and quickly add peanut butter, vanilla and oatmeal. On a sheet of waxed paper, drop mixture by the teaspoonfuls.


Wait about about ten minutes for the cookies to cool and harden. Serve to hungry hubby!


Thursday, February 9, 2012

Easy Chicken Pot Pie


I love comfort foods, especially in the winter. The only problem is that I don't have a ton of time to cook them during the week. This is the perfect solution. I've taken several shortcuts to save time, but you'd never know! I used my Seasoned Chicken to make this recipe, but I've also used a rotisserie chicken from my grocery store with great results. I add a small can of corn to the mix because it's one of Luke's favorite veggies, but you could take this out or substitute it to fit your liking.This really should be called Super Easy Chicken Pot Pie because it's so simple! Prep time is only about 10 minutes, maybe a little less if you don't care about making it look pretty. 

In other news, I just found out from a friend that our wedding pictures were featured on Lisa Hessel's blog a few days ago! She did such a fabulous job, I loved looking at the pictures again! You can check it out here: http://lisahesselphotography.com/blog/?p=4059


Easy Chicken Pot Pie

Ingredients
  • 1 can 98% fat free cream of chicken soup
  • 1 can 98% fat free cream of mushroom soup
  • 1 can mixed vegetables 
  • 1 small can of corn (optional)
  • 2 1/2 cups cooked chicken
  • 1/2 tsp salt
  • 1/4 tsp pepper
  • 1 Tbs Italian seasoning
  • 2 refrigerated pie crusts


Directions

Preheat oven to 425 degrees F.

Place one pie crust on the bottom of a greased pie plate.

In a large bowl, combine all remaining ingredients. 


Poor into the pie plate.


Place the second pie crust on top, and crimp the edges. 


Luke is amazing at crimping pie edges, so I had to show one more picture!


Cut a few slits in the top.


Place in oven and bake for 25-30 minutes or until golden brown.


It was delicious, and the leftovers were good too! 


I think Abby approves ;)


Wednesday, February 8, 2012

Seasoned Chicken in the Crock-Pot


I love using my crock-pot whenever possible, so when I saw this recipe on Pinterest I knew I would have to try it! It has a basic rub that makes the chicken super flavorful. It was also very moist. I plan on using some of the meat to make Chicken Pot Pie later this week (recipe to follow). I think this chicken would be good in so many different recipes, like chicken salad, BBQ chicken sandwiches, and quesadillas, just to name a few! It's super versatile and very easy to make! 


Seasoned Chicken in the Crock-Pot

Ingredients
  • 1 broiler/fryer chicken 
  • 2 Tbsp Paprika
  • 1/2 tsp. cayenne pepper
  • 1 1/2 tsp onion powder
  •  3 cloves garlic  (or 2 Tbsp garlic powder)
  • 1 tsp salt
  • 1/2 tsp black pepper
  • A few tsp. of water
Directions 

First, rinse off your chicken and remove the neck and giblets, if yours came with any.


Next, mix the remaining ingredients in a bowl. Add water 1 tsp. at a time to the mixture until a paste forms.

Coat the chicken with the paste and set the chicken in the crock-pot breast side down.


Cover and cook for 6-7 hours on low or 3.5-4.5 hours on high. It will make your whole house smell delicious! I wanted to take a picture of it when it was finished, but when I tried to take it out of the crock pot it was literally falling off the bone. 

Once it's done, shred the meat as desired.


Adapted from: http://busy-mommy.com/2010/02/how-to-make-your-own-rotisserie-chicken.html

Tuesday, February 7, 2012

Homemade Apple Cinnamon Pop-Tarts with Cinnamon Glaze


After making the French Silk Pie, I still had one refrigerated pie crust left, so I decided to try my hand at making homemade pop-tarts. I had a couple of apples in the fridge, so I though a cinnamon apple filling would be perfect! The filling is similar to what you would find in an apple pie, except the apples are cut more finely. While it's not the healthiest breakfast, it sure did taste good! With Valentine's Day coming up, I think it would be cute to use heart shaped cookie cutters to cut the pie crust. Then you'd have heart shaped pop-tarts to share!


Homemade Apple Cinnamon Pop-Tarts with Cinnamon Icing
Yields 4 poptarts


Ingredients
  • 1 refrigerated pie crust
  • 3 tablespoons unsalted butter
  • 2 apples, peeled, cored, and thinly sliced
  • 1/2 cup packed light brown sugar
  • 1 egg, lightly beaten
  • 1/2 teaspoon ground cinnamon
  • 1/8 teaspoon kosher salt
  • 1/2 cup unbleached all purpose flour
  • 1 cup powdered sugar
  • 2 tablespoons plus 2 teaspoons water
  • 1/2 teaspoon ground cinnamon


Directions


Preheat oven to 375 degrees F.

Melt the butter over high heat in a medium sauce pan. Add the apples and stir until they just start to soften, about 2 or 3 minutes. Add the sugar and continue stirring for another 3 to 4 minutes or until the sugar has melted and mixed with the apples. Remove from the heat and transfer the apple mixture to a bowl. Cool for 30 minutes. Add the egg, cinnamon, salt, and flour to the apples and mix with a spatula until they are thoroughly and evenly incorporated. Cool completely before using.

As the mixture cools, roll the pie crust out on a flat surface. Using a pizza cutter, cut in half. Next, cut each half into four sections as evenly as possible. 

Put a few spoonfuls of apple in the center of half of the cut dough.  Place the sections without filling on top. Gently press the edges together using fork. 

Bake for 22-24 minutes, or until golden brown.

To make the glaze, whisk the powdered sugar, water, and cinnamon together. Drizzle over the cooked pop-tarts.


Adapted from:http://bunsinmyoven.com/2011/04/27/homemade-apple-pie-pop-tarts/

Monday, February 6, 2012

Chicago Style Deep Dish Pizza


Being from a suburb of Chicago my husband loves deep dish pizza. On our very first date he took me out for deep dish pizza at Pi, the only place to get deep dish in St. Louis. We went there again the night he proposed to me. Needless to say there are some really fond memories associated with this pizza! We decided to try to make our own version of this delicious pizza, using inspiration from  Lou Malnati's, Tortorice's, and Pi. We both think that we have perfected our homemade version! 

This pizza is built way different from your average pizza. First you put down the cheese, then the toppings, then the sauce. Another difference is that the cheese is sliced not shredded.I love this pizza because it tastes so fresh! And just as a side note, when I first heard "deep dish" I automatically thought it meant "thick crust," (which I don't care for generally) but that was absolutely not true! This pizza actually has a thin, buttery crust, it's the pan that makes it deep dish. This recipe makes enough dough for 2 pizzas. We usually freeze one half and then thaw it out when we are ready to make another pizza.

You can substitute or add to our toppings to make your perfect creation!


Chicago Style Deep Dish Pizza


Pizza Dough 


  • 2 cups warm water 
  • 1 and 1/8 tsp yeast
  • 1 Tbsp salt
  • 2 lbs bread flour (5-6 cups)
  • 1/3 cup butter (plus more for coating the pan), softened
  • Yellow cornmeal


Toppings

  • 12 oz mozzarella cheese, sliced
  • 8 oz provolone cheese, sliced
  • Spinach (optional)
  • Onions, diced (optional)
  • Pepperoni (optional)
  • Mushrooms, sliced (optional)
  • 28 oz can of crushed tomatoes
  • 3 roma tomatoes, diced with seeds removed
  • Italian seasoning
  • Parmesan cheese, grated

Directions


In a mixer combine the warm water and the yeast and allow the yeast to dissolve then dissolve the salt. Add the remaining ingredients except for the cornmeal and begin to mix the dough using a dough hook on low speed. Once a ball is formed, mix on medium speed for 1 to 2 minutes until the dough becomes elastic and smooth. Remove from the mixer and place in a bowl coated with olive oil. Allow the dough to rest for approximately 4 hours. Once the dough is rested, split it in half, putting one half in the freezer for next time.
Preheat oven to 425 degrees F. Coat deep dish pan with melted butter and sprinkle yellow cornmeal over the bottom.


In a 14" deep dish pizza pan (we have this one from Bed, Bath and Beyond), spread the dough using your fingers at the bottom of the pan and make sure to have enough dough to come up the sides of the pan. Brush the top of the dough with remaining melted butter.


Place the sliced cheese evenly on top of the crust.


Next, add the toppings. For us this was pepperoni and onions on the whole thing plus spinach and mushrooms on my part!


In a bowl, combine the can of crushed tomatoes and diced tomatoes. Then pour the mixture over the toppings and spread evenly over the pizza (we use the back of a spoon). Sprinkle with Italian seasoning and parmesan cheese. 


Place in the oven for 30 to 40 minutes until golden and crispy. Serve and enjoy!


Friday, February 3, 2012

French Silk Pie


I love chocolate. All kinds. I think my love of chocolate comes from my Grandma Ruth. We would always have frozen chocolate yogurt when I came to visit. Which is a real treat when you live with a house full of vanilla lovers like I did! So of course one of my favorite pies is french silk. This pie was rich but fluffy at the same time. An electric mixer is a must if you want to get this perfect texture. We topped it with fresh, homemade whipped cream. Go make it for the chocolate lover in your life! Happy Friday!


French Silk Pie


Ingredients
  • 4 ounces Unsweetened Baking Chocolate
  • 1 cup Salted Butter, Softened
  • 1 1/2 cup Sugar
  • 1 teaspoon Vanilla Extract
  • 4 whole Eggs 
  • 1 refrigerated pie crust
  • Whipped cream

Cook the pie crust in a pie plate as directed on package. I put dry beans wrapped in aluminum foil on the bottom to keep it from rising up. 
In small microwave safe bowl melt 4 ounces of unsweetened baking chocolate until stirrable. Set aside to cool.
In a large bowl with an electric mixer beat 1 cup of regular butter and 1 ½ cups of white sugar until fluffy (about 1 to 2 minutes). When melted chocolate is cooled, drizzle it over the butter/sugar mixture. Add 1 teaspoon of vanilla extract. Beat the mixture thoroughly until combined using the whisk attachment.
Turn your mixer to a medium speed and over a period of 15 to 20 minutes add in the four eggs, one at a time, leaving about 5 minutes between each egg addition. Once the pie filling is well mixed, pour it into the baked pie shell, scraping every last speck of it out of the bowl. Smooth out the pie filling and place pie in the refrigerator to chill for at least two hours. Serve with whipped cream.


Thursday, February 2, 2012

Spicy Shrimp Tempura Sushi


Luke and I both love sushi. A LOT! But it's on the pricey side at restaurants, especially if you eat as much of it as we do! So we decided to try to make it ourselves. I was intimidated at first but actually it was much simpler than I thought it would be. We made a simple roll that consisted of shrimp tempura, cucumber, avocado, and spicy sauce (our own concoction!). We kind of cheated and used frozen shrimp tempura, but it was tasty and easy, so a win-win for us! There was no raw seafood in this recipe, so don't be afraid to give this sushi a try! You use the vinegared dressing to make the rice "sticky", which is ideal for making sushi. I hope you find this step by step guide helpful! 

Spicy Shrimp Tempura Sushi

Ingredients
  • 4 C sushi rice (short grain white rice)
  • 1/8 C + 1 Tbsp rice wine vinegar
  • 1/4 C sugar
  • 1 Tbsp salt
  • Frozen shrimp tempura
  • Cucumber, sliced into thin slivers
  • Avocado, sliced into slivers
  • Japanese Mayo
  • Sriracha hot chili sauce
  • Nori paper
  • Sushi mat for rolling the sushi 


Directions


I preheat the oven and put the shrimp in to cook, following the directions on the package. 

To make the rice and vinegared dressing:
Cook rice as directed on the package. While rice is cooking prepare the vinegared dressing by dissolving the sugar and salt granules in the vinegar over low heat in a small sauce pan. Immediately remove from the heat and allow it to cool. Empty the hot rice into a bowl and pour the vinegared dressing over the rice. Use a wooden spoon to gently fold the rice so the dressing is distributed evenly.

Next prepare the spicy sauce by combining the Japanese May and the Sriracha hot chili sauce is a bowl. I didn't measure this, I just sort of taste tested it until I got a good, spicy sauce!

Alright now for the fun part! Start by laying down your sushi mat (*hint-we cover ours in plastic wrap to keep rice from sticking in the crevices). Next, lay a sheet of nori paper down on top. I recommend having a bowl of water nearby that you can dip your fingers in every now and then. The rice is very sticky so this helps it to spread out a little easier. 

Start spreading the rice all over the paper. I would recommend leaving about 1 1/2 inches of one end of the paper uncovered. This makes it easier to roll and ensures you don't get too much rice, otherwise the roll is too dense. (Note: this is not pictured, because we figured it out after the first one, ha!)


Next add the shrimp, cucumber, avocado, and sauce to one side, like so.


Begin rolling from the side with the filling. 


Would ya' look at that?? Luke's  a pro sushi roller!


Slice it with a sharp knife. Serve with soy sauce and wasabi. And there you have it folks!! 


Wednesday, February 1, 2012

Tortellini Soup


I stumbled upon this recipe last fall on one of my favorite food blogs Annie's Eats. It looked so fresh and yummy, and who doesn't like a nice hot bowl of soup on a cold day? I made a few tweaks to the recipe to give it a bit more flavor and I am really pleased with the results! Luke liked it too, even though he's not a huge soup fan. It was very easy to make, perfect for a week night meal! Most of the ingredients I already had on hand, I just had to buy the fresh tortellini, which I found by the specialty cheeses in my grocery store. 


Tortellini Soup

Ingredients
  • 1 tbsp. olive oil
  • ½ cup onion, chopped
  • 2 cloves garlic, minced
  • 1 tsp. dried oregano
  • 1 tsp. cayenne pepper
  • 1 (15 oz.) can diced tomatoes, with juices (I use the one with the Italian spices)
  • 4 cups low-sodium chicken broth)
  • 9 oz. fresh tortellini
  • 3 cups fresh baby spinach, loosely packed
  • Salt and pepper
  • Grated Parmesan, for serving
Directions

In a large pot, heat the olive oil over medium-high heat.  Add the onions to the pan and cook until beginning to soften, about 5 minutes.  Add in the garlic and cook, stirring frequently, just until fragrant, about 1 minute.  Mix in the oregano, cayenne pepper, and diced tomatoes.  Add the broth to the pot.  Bring the mixture to a boil.  Add the tortellini to the pot and cook according to the package directions.  One minute before the tortellini is fully cooked, stir in the spinach.  Remove from the heat.  Season with salt and pepper to taste.  Serve warm with grated Parmesan.


Adapted from: http://annies-eats.com/2011/02/15/tortellini-soup/